
Welcome to the important news site.
There are various options for adding a border around cells in Microsoft Excel, but if you are a little creative or want to use a special border, you can go for creating a custom border in Excel and use it for your future projects.
Default margins around Excel cells are appropriate and efficient in most cases. You can put borders on the top, bottom, left and right side of the cell, and of course it is possible to choose the thickness and style of the line in this Microsoft program.
However, you may be faced with a lot of data and want to use a feature outside of the default options available in Excel. At this time, you can go to the dedicated margin in Excel, which we will teach you how to make. Stay with Digiato till the end.
Create a custom cell border style in Excel
Using cell styles, you can create and customize a cell border and use it throughout the workbook.
To get started, open the workbook in Excel and then go to the Home tab. In the Styles section on the top bar, click on Cell Styles and then select New Cell Style.

In the Style window that appears, click Format.

Custom border format
When the Format Cells window opens, select the Border tab. In the left section, choose the style and color you want.

On the right, use the ready-made collections and box borders for where and how to display the borders. You can use a border at the top, bottom, left, or right, and you can also use a diagonal line in the center of the cell. By clicking on each border box, you will see a preview of the border.

In this example, we have created a red cell border with thick and thin lines that also pass through the center of the cell. This type of margin allows us to remove some of the data when examining it.
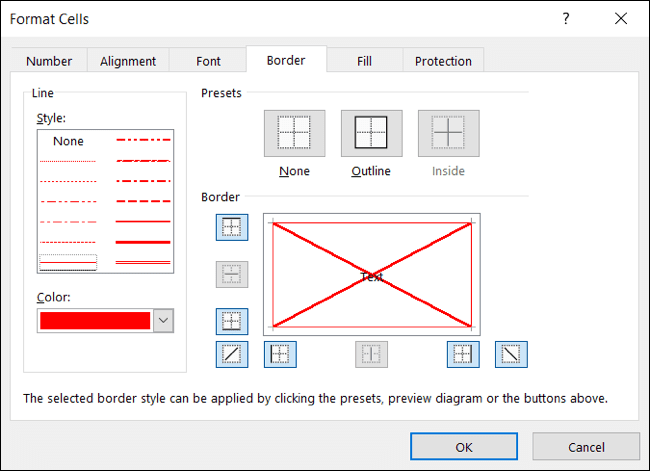
Due to the variety of options, you can change the colors, line style, and their thickness, as well as change different parts of it. Therefore, the user has full control over the customization of borders.

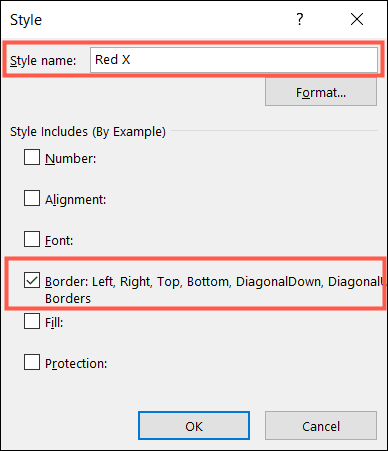
When finished, click OK to return to the Style window. Here you need to complete the cell style setting.
Complete cell style
Choose a name for your custom border. Then, below that, disable all options except Border. If you want to use one of the additional styles next to your custom border, enable it.
Next to the Border option, you will see the settings you have chosen for the border. Click OK to complete creating the custom border cell style.
Using dedicated margin
When you want to use your custom cell border, select a cell or range of cells. Go to the Home tab and do not click on the “Cell Styles” option in the top bar. In the menu that opens, the Custom section can be seen at the top. Click on the border you created.

You can use this special border or the same cell style in every sheet of your workbook and make it a convenient and suitable format.
We hope you enjoyed the Office training materials. Check out our other articles.


