Welcome to the important news site.
There are many ways to take a screenshot on a computer, one of which is the print screen key. In this article, we teach how to use print screen in Windows 10.
There is a print screen key on the keyboard, if you don’t know how to use it, pressing it won’t get you anywhere. In this article, we teach how to use the print screen key in Windows 10, then with Digiato Stay tuned.
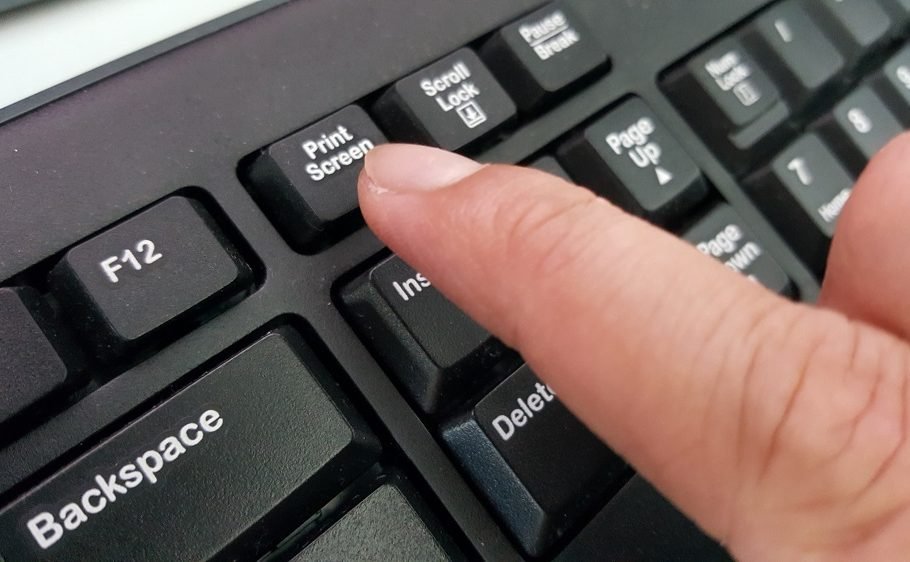
Where is the print screen key located?
The print screen key is usually seen on the upper right side of the keyboard and one of the following words is placed on it:
- Prt sc
- PrtSc
- PrtScn
- PrntScrn
If there is another word in front of this phrase, you must press the Fn key to use it. Hold this key and take a screenshot of the page by pressing print screen.
How to use print screen in Windows 10
There are several ways to take a screenshot by print screen in Windows 10, the easiest one is to press the print screen key to make a copy of the entire screen and paste it in programs like Microsoft Paint, for which you need to press Ctrl + V keys. press the Next, we explain other methods:
Screenshot of the whole page with print screen
The above method does not automatically save the screenshot in your computer. To be able to save a screenshot without pasting, press the Windows key and Print Screen at the same time. The brightness of the screen will decrease for a while, which indicates taking a screenshot of the screen. In this method, a screenshot is taken of the entire screen.

With this method, the screenshot is available in the path Pictures > Screenshots, of course, if you don’t find it in this folder, follow this path: C:UsersusernamePicturesScreenshots

Screenshot of an active window with print screen
Instead of taking a screenshot of the entire screen, with this method it is possible to take a screenshot of an active window. For example, if you want to take a screenshot of a Word page, you can do it by pressing the Alt key along with Print Screen. Press them simultaneously to take a screenshot of the active window.

In this method, the screenshot is not saved directly and you have to paste it in programs like Microsoft Paint.
Using Print Screen as Snipping Tool in Windows 10
If the above methods do not meet your needs, you can assign the Snipping Tool to the Print Screen key. By doing this, by pressing the print screen key on the keyboard, the snapping tool is activated in Windows 10, and you can use it to take screenshots from different parts of the screen.
With this method, you can specify the part you want to take a screenshot of and make changes to it. Screenshots will open in the Snipping Tool and you can write text or draw on them. Finally, save it.
To assign the Snipping Tool to the print screen in Windows 10, follow the steps below:
- Open the settings section of your computer through the start menu or by pressing the Windows + I keys. Go to the “Ease of Access” section in the settings.
- On the left sidebar of the Ease of Access section, scroll down and click on the Keyboard option. In the right panel, the keyboard settings will appear, in which you should scroll down and enable the option to use print screen for sniping.

If you don’t want to assign the print screen key to the snapping tool in Windows 10, you can open this tool with a shortcut. To do this, press the Windows + Shift + S keys at the same time, although you can also access it through the Start menu instead.
