Welcome to the important news site.
All of us sometimes face communication problems in your system, at this time we can reset the network settings. In this article, we want to know how to reset network settings in Windows 11 and also how to change DNS in to teach you Windows 11 .
If you’re struggling with a lot of connectivity issues, it’s probably time to reset your network settings in Windows 11. Of course, in most cases, before doing this, you should try other methods, but if none of them worked for you, you should reset the network settings.
Ways to fix network problems include checking modem and router status, using network troubleshooter, updating drivers and restarting the system. Finally, if these solutions do not solve the problems, you should go to reset the network settings in Windows 11.
Reset network settings in Windows 11
Network settings manage how your computer communicates with the Internet. In the Windows operating system, you can change these settings, although sometimes this has consequences. In this situation, the last solution should be to reset the settings.
When you reset your system’s network settings, Windows deletes all Wi-Fi connections and their passwords, as well as any saved Ethernet connections. In addition, the network adapter (Network Adapter) and other critical network components are removed and reinstalled with original settings.
To reset network settings in Windows 11, follow the steps below:
- Go to Windows settings. To do this, type Settings in the search bar of the start menu and choose the best option according to it. Of course, you can also use Windows and I keys instead of doing this.
- Now select Network & Internet from the left side. To reset the network, click Advanced network settings.
- In the More settings section of Advanced network settings, select Network reset.
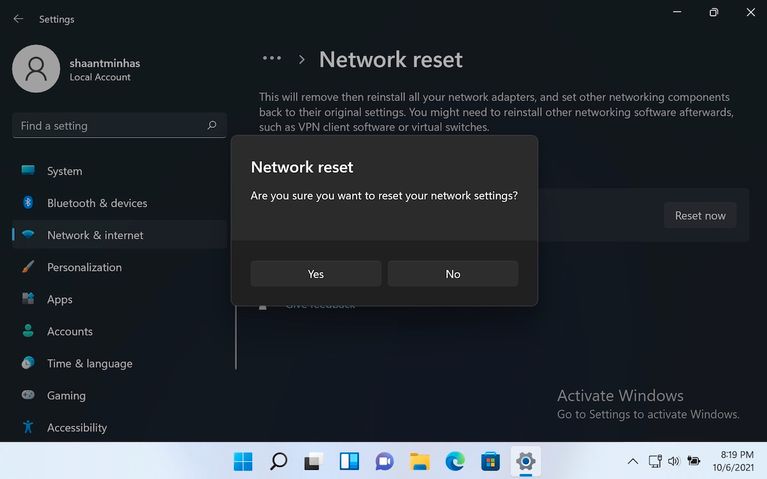
- Finally, click Reset now.

A message will appear to continue the process, you must click on the Yes option. With this, the reset process will start and after the reset is complete, you will be asked to restart the system. This will apply the settings successfully.
With these few simple steps, you can reset the network settings in Windows 11. This will solve all the problems, but you have to do all the settings from scratch, which can take some time.
Besides resetting network settings, we also teach you how to change DNS in Windows 11. Default settings are also created when the ISP (Internet Service Provider) first sets up the Internet connection. These default network settings are associated with a special configuration called the Domain Name System (DNS) that is critical to online communication.
For most ISPs, the security or privacy of your DNS is of little importance, and because of this, it can be exposed to various risks. Next, we will teach you how to change the default DNS settings in Windows 11.
How to change DNS settings in Windows 11
Most of the time when you get a new internet connection, your ISP sets up a DNS for you. Besides the default DNS of the server provided by your ISP, you can go to another DNS.
To change DNS in Windows 11, do the following steps:
- Go to Windows settings with Win + I keys and select Network & Internet option.
- Then click on Advanced network settings.
- Here, Click on the available network adapter under the Network Adapters section. For example, if you are using an Ethernet connection, select it. You can also do this for Wi-Fi connection.
- Click on View additional properties option.
- Now click the Edit button in front of assigning DNS server.
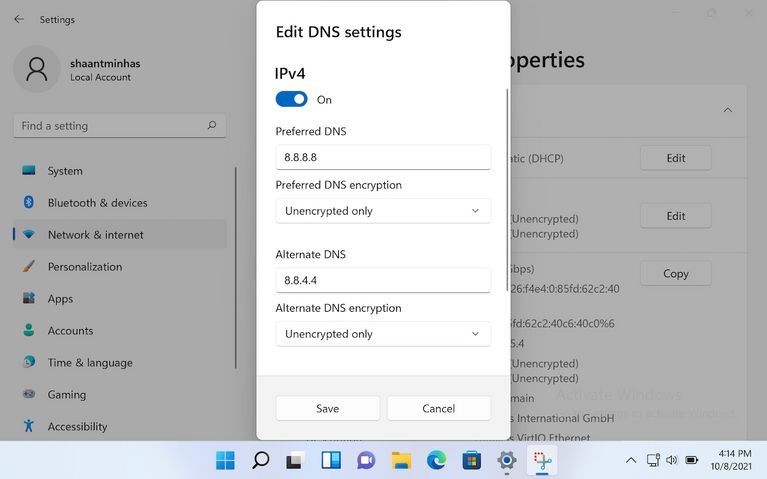
- Under Edit DNS Settings, click Manual and then select IPv4 or IPv6 settings.

In this tutorial, we chose IPv4 settings. With IPv4 enabled, you’ll have a new set of blank fields to fill in that include a variety of things. It is possible to use the new DNS server of Google and Cloudflare, whose Preferred DNS and Alternate DNS are as follows:
- Cloudflare: 1.1.1.1 and 1.0.0.1
- Google: 8.8. 8.8 and 8.8.4.4
Google DNS is used in the screenshot above, but you can use any other DNS and put their values in their proper place. At the end, click on the Save option, so that after several seconds, the DNS settings of Windows 11 will be changed. With these few simple steps, you can change Windows 11 DNS.


