
Welcome to the important news site.
Microsoft is constantly trying to release new updates for its latest operating system to provide users with new features and improve its overall performance. But this process can be problematic in some cases and force people to stop updating Windows 11.
Usually, one of the main goals of releasing updates is to fix bugs related to the operating system; But these same updates can become a major problem and prevent Windows from loading properly. The default features of Windows 11 allow users to temporarily stop receiving new updates; But if you are looking for a permanent solution to the said problem, you should manipulate the registry or disable the update service manually.
Stop Windows 11 update from within settings
Users will be able to stop downloading and installing new updates for 5 weeks through the settings section of Windows 11. This feature can be very useful for delaying the update of the operating system for a few weeks, but it will not be considered as a permanent method.

To delay receiving updates, first refer to the Settings application, or use the combination key Win + I to open it. Next, click on the Windows Update option through the left panel. Now click More Options in the right panel and select one of the values between one to five weeks from the Pause updates drop-down menu according to your needs. Finally, hit the Pause for * weeks button to save the changes.
Windows will refuse to receive and install new update packages within the specified time period. If you wanted to reactivate the feature of automatic download of updates, you can go back to the Windows Update page and click on the Resume Update button to start the manual update process.
Prevent updates by changing network settings
Another easy and fast way to stop Windows 11 update is to change the network status to Metered mode. This solution also works on the previous version of the Microsoft operating system and is intended to prevent the consumption of additional volume in limited connections. Users can use the mentioned mode for both Ethernet and Wi-Fi connections.
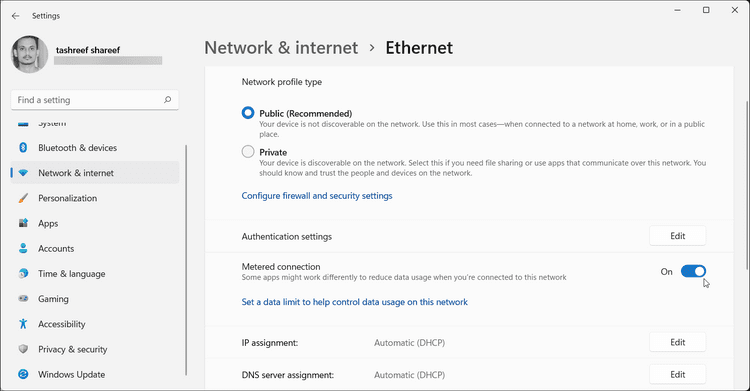
To enable metered mode, open the settings section again or just press Win + I key combination. Then, from the left panel, go to the Network & Internet tab and then click on the Properties option so that you can see the available options for the Ethernet or Wi-Fi network. Scroll to the bottom of the page and turn on the key next to Metered connection.
Henceforth, downloads of required or optional updates will stop while connected to a metered network. If you intend to avoid Windows update altogether, you should set all your networks to the mentioned mode. Note that when the mentioned mode is active, some features related to the Internet, including offline synchronization of files or the features of some software, may be limited or completely unavailable.
Using software Windows Update Blocker Utility
If you want to stop updating Windows 11 permanently, but you are not interested in using complicated methods, Windows Update Blocker Utility can be an ideal option for you. Although this program was originally developed for Windows 10; But it will be able to prevent the update of the new version of Windows. Also, its graphical user interface can make controlling the settings easier for most users.
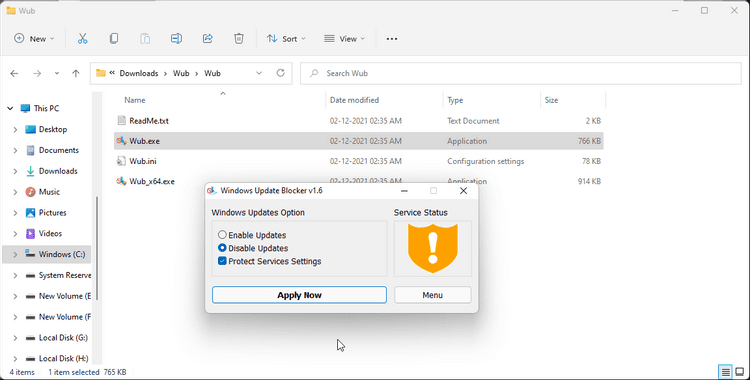
To get Windows Update Blocker Utility, first go to the software developer’s official website Visit and download the portable version of the program. Next, extract the saved ZIP file and then run the wub.exe file. Now select the Disable updates option from the items available in the app and click on the Apply Now button. If the process of deactivating receiving updates is successful, the Service Status icon will turn green. Now close the program and then restart the device.
To access more settings inside the software, you can click on the Menu option to access the Service Manager tool and apply your desired configuration. If you are not interested in using a separate program to control receiving updates in your system, you can use the other methods mentioned in the text.
Using Update Services to control automatic updates
Disabling the Windows Update Services process is one of the ways to permanently stop receiving and installing new updates. This internal tool in Windows is responsible for checking the release of new update packages and downloading them.

To stop the Windows Update service, first type the word Run in the search bar of the start menu and then click on the first option or press the combination key Win + R. Next, write services.msc in the window and click OK or press Enter to display the Service Manager tool. In the Services window, find the Windows Update option and after right-clicking on it, select the Properties option from the list. From the drop-down menu that appears, click Startup type and set it to Disabled. Finally, click OK and click Apply to save the changes. Now you need to restart your system to avoid receiving new updates automatically.
Stop Windows 11 update with Group Policy Editor
The Group Policy Editor feature is one of the tools that can be used to prevent automatic download and installation of updates. Of course, this feature is only available in Pro and more advanced versions of Windows 11; As a result, all users may not be able to use it by default on their operating system. Of course, with the help of a simple bat script, gpedit.msc can also be activated in the Home version of Windows.
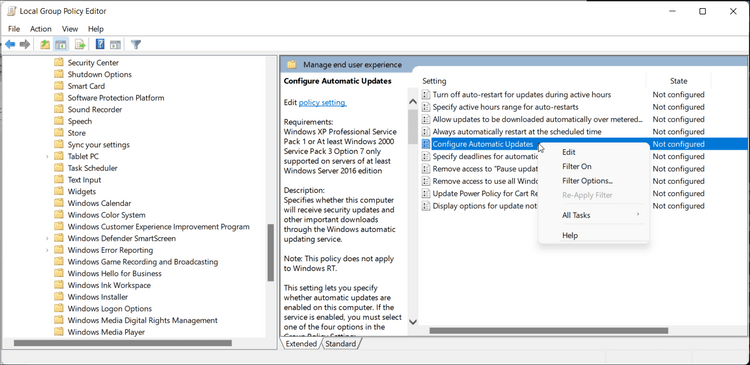
To start, press Win + X to open the WinX menu. Then click on the Run option among the items in the list. In the entry field of the Run window, type gpedit.msc and then click OK or press Enter to open the Group Policy Editor. Inside this section, follow the path below.
Computer Configuration > Administrative Templates > Windows Components > Windows Update
Now double click on Manager end user experience option. Next, double-click Configure Automatic Updates from the right menu and set it to Disabled. Finally, press the Apply button and select OK to save the applied changes. You can stop automatic updates by restarting your system.
Using Registry Editor to stop Windows 11 update
The last way to stop the automatic update in Windows 11 is to manipulate the registry entries with the help of the operating system’s Registry Editor tool. Note that making incorrect changes to the registry can completely disable your system; As a result, it is better to make backup copies of your sensitive and necessary files and, if possible, define a restore point before editing the entries.
At first, by opening the start menu, type the term Registry Editor or directly enter its name in the Windows search bar. Then, from the search results, select the option with the same name and follow the path below.
HKEY_LOCAL_MACHINESOFTWAREPoliciesMicrosoftWindows
Look for the WindowsUpdate key at the bottom of the Windows title; If it does not exist, create it manually. For this, it is enough to right-click on Windows and then select the Key option from the New section. Now change the name of the new key to WindowsUpdate and create a new key by right clicking on it. Rename the newly created key to AU and define a new DWORD value titled NoAutoUpdate.
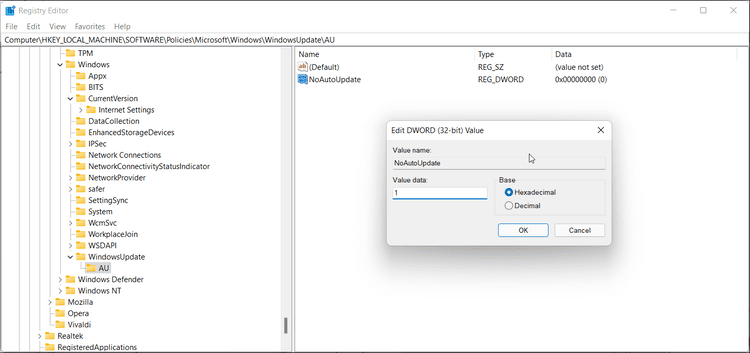
To create the said value, right-click the AU key and then select DWORD (32 bit) from the New menu. Change the name of the mentioned value to NoAutoUpdate and after double-clicking on this value, enter the number 1 in the Value Data field. Finally, press the OK key to save the changes and after closing the registry editor tool, restart your system.
As we mentioned in the previous parts, Microsoft has built two internal functions to stop the Windows 11 update by default in its operating system. Of course, none of these two methods permanently prevent receiving and installing new update packages; But fortunately, users can permanently limit the update process by using special software or system tools.
Note that every major update of Windows 11 removes all the mentioned changes; As a result, after installing new updates, you must configure your system again to not receive future versions.


