
Welcome to the important news site.
We are all familiar with Windows File Explorer. Because if this simple tool did not exist by default on Windows, we would not be able to access the files on the system.
However, File Explorer is not as simple as we think, and Redmondi has included interesting features that can be used to achieve good features. For this reason, in the following, we will go to 10 interesting features of File Explorer that you may not know about.
1) Renaming several files at the same time

Of course, we all know how to change the name of a file. But few people know that you can change the name of several different files using File Explorer. For this, you must first select the files you want.
Then, right-click on the file you want to rename and select “Rename”. Now type the specific name you have in mind for that file and then press the enter key.
By doing this process, the work is finished and all the files will be renamed at the same time. But you should also know that using this method, all the files get the same name. Of course, Windows automatically adds a number to the end of each file as a distinction.
2) Clearing the search history of files
![]()
By default, File Explorer saves information about all the files you’ve opened or searched for. However, you don’t need to do anything fancy to clear this data.
Open File Explorer and click on the File tab at the top left of the window. Now select “Change folder and search options” from the opened page.
Then in the “General” section, click the “Clear” button to completely clear the File Explorer memory. In addition, by unchecking the two options “Show recently used files in Quick access” and “Show frequently used folders in Quick access” you can save search information by File Explorer. Avoid completely.
4) Remove all ads

Recently, Microsoft has placed advertisements for its products in place of Windows, which may be annoying for many. However, closing the window of these advertisements is not a difficult task, and you can delete them from the screen by clicking the “x” in their window.
But it is possible to completely prevent the display of these ads by using File Explorer settings and get rid of them forever. To access these settings, you must visit the “Change folder and search options” settings again.
Now go to “View” tab and uncheck “Show sync provider notifications” from there. By doing this process, the work is finished and you will no longer see any advertisements in the Windows environment.
4) Access the This PC window by clicking on File Explorer
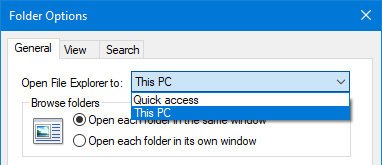
By default, when you open File Explorer, the “Quick Access” window will be displayed for you. But you can change this procedure by changing the settings and access the This PC window by clicking on File Explorer.
For this, just go to “Change folder and search options” again. Then, in the same “General tab, open the bar opposite the word “Open File Explorer“. Now select the “This PC” option so that from now on you can directly access the hard drives of your system by clicking on File Explorer.
5) Show Recycle Bin and Control Panel in the sidebar

If you have paid attention to the sidebar of File Explorer, you must be aware of the absence of Control Panel and Recycle Bin. But it is interesting to know that you can add them to the sidebar of File Explorer with just a few simple clicks.
Just find an empty space in the sidebar and right click on it. Now, click on “Show all folders” from the displayed options so that some new options including Recycle Bin and Control Panel will be displayed in the sidebar.
6) Several keyboard shortcuts
some time ago in digiato training section for you from some the most used keyboard shortcut. However, there are a number of keyboard shortcuts that can be used to avoid clicking too much in the File Explorer environment.
- Open file explorer: Windows key + E
- Open a similar window: Ctrl + N
- Close window: Ctrl + W
- Select the address bar: Ctrl + D
- Open search bar: Ctrl + F
- Create a new folder: Ctrl + Shift + N
- Access to higher windows: Alt + Up
- Moving between previous and next pages: Alt + Right/Left
7) Remove the cloud service from the sidebar
If you have paid attention to the sidebar of File Explorer, you must have seen the icon of cloud services installed on the system. Being them is an advantage in itself; Because it is possible to access the uploaded information at a faster speed through them.
But if you like a quieter environment for your work system, you can avoid displaying their icons by following a slightly complicated path.
Of course, the process that we are going to explain to you is a bit dangerous and you should be careful while following the steps. First, search for the term “regedit” and click on the first result found.
By doing this, the registry editor window will open for you, and just one simple mistake will cause many problems. After that, pay close attention to the steps and do everything correctly one by one.
From the top bar of the window, select the “Edit” option and click on the “Find” option from the opened menu. Now type “IsPinned” in the search bar. By doing this, the first results of the submitted request will be displayed.
Now in the right part, look for the German named “Default” and type “REG_SZ“. By looking at the data value of these elements, you can understand which service you are dealing with.

For example, the data value of the element “OneDrive” refers to the OneDrive cloud service. If you do not find the elements related to the service you want, you can use the “F3” key to search for it.
Having found the desired service, now double-click on “System.IsPinnedToNameSpaceTree” to open its editor window. Now set the “Value data” value to zero and then press the OK key.
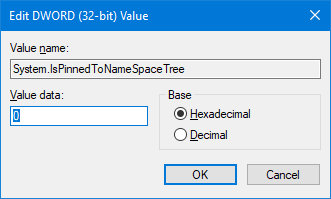
By doing these steps, the work is done and the service you want will be removed from the sidebar. If you want, you can restore the deleted service by doing the same process and putting a value of 1 for “Value data“.
8) Access more features with ExtraBits
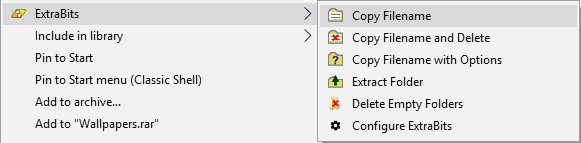
Besides all the tricks that we mentioned in this article, there is another solution that can be accessed only by installing a separate software. ExtraBits is a software that helps File Explorer and adds a lot of interesting and useful features to it.
Only by installing this simple software, you can achieve features such as copying file names, changing multiple names, deleting empty folders, and several other possibilities. Using ExtraBits is also very simple; Download the installation file and go through the installation process. Then right-click on any file or folder you want to access ExtraBits.
9) Filling the New menu with new items
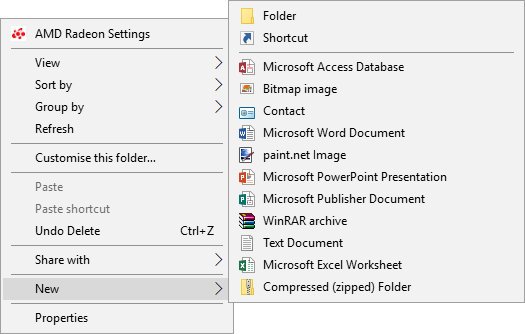
We know that using File Explorer we can create a new file anywhere. Just right-click on the empty space of the page and use the “New” option to create different files.
But it is interesting to know that you can customize the list of “New” items. For this, you should take help from “Notepad” and type the following statement in it.

Now, instead of “XXX.“, put the extension of any file type you want. For example, to access the Word file in this menu, you must use the word “doc.”. Then save the Notpad file with the name “filetype.reg” and open it again.
This time the system will ask you whether you want to access the registry settings or not. Click “Yes” to complete the process. Now, if you go to the New menu again, you can see the applied settings.
10) Changing the direction of images using File Explorer

In addition to all the mentioned features, it should also be mentioned that File Explorer is able to change the direction of images. Just select the photo or photos that you want to change the direction of their display.
Then go to the top bar and select the “Manage” tab from there. Now you can rotate the axis of the images and change their display direction by using two options Rotate left or Rotate right.

